Thursday, December 30, 2010

Creative Leftovers - Turkey Tacos, Jacket Potato and More

Hello everyone, Its taken a week but I'm back!! I had a bit of a disaster on boxing day , and lost my big hard drive ... and ALOT of photos, including my next 4 blog posts :(   The crazy thing is I had asked for a back up system for Christmas as my lap top is starting to die,  so I had amalgamated all my photos and music to my big drive on my desk top....  which failed while I was unwrapping the back up system :( Murphy must just LOVE me!!!  I managed to salvage 600 of about 5000 shots that were not backed up properly.   So lesson learned ,  make sure you back up weekly , not quarterly like I had been doing.

So since its Christmas time, and I'm sure your bored silly of Turkey by now, I thought I'd show you a couple of interesting way to use up the extras :)  Grab your leftovers , and lets begin ! 


You can use whatever you have on hand,   I went for my favourites .  Peppers, onions, mushroom, and a little sun dried tomato and garlic minced up together,

I like a medium chop :) 1:1  veggie to turkey ratio .
Click the link below to see the rest :)

Monday, December 20, 2010

Less Words, More Food 2 :)

Its been a strange week for food for me,  a few days of cooking like a mad man ,  then a couple of days surviving on cheese and toast :)  Also,oddly enough it started with meatballs, and ended with meatballs :)
Here is a quick look at what has been coming out of my kitchen :)

Grass fed Beef Meatballs with Garlic Latkes

More free range beef, all from a local farm :) Today was -20C a good stew was needed .

Thursday, December 16, 2010

MMmmm Meatballs!!

Who doesn't love meatballs ??  You can make them out of almost anything .. Beef , Pork, Turkey , chicken or just about anything that can be ground up :)  They can be baked, pan fried, added to a stew or casserole...  the options are almost endless once you start thinking about what you can put in the meatball itself .  Today I'm going to show you one of my favourites,  simply, easy and loads of flavour.  For this meatball adventure, I'm going to start them in the pan , and finish them in the oven.  So if you are following along , you will need an oven safe pan.  

The minimum required is just a pound of meat , and egg and bread crumbs... but don't be afraid to have a look around in your fridge for some extra flavours.

Here I have diced Red Onion, Red Pepper, Mushrooms, some garlic/mushroom hummus, a couple loves of garlic,  a pound of free range ground beef, a dried chili pepper,  bread crumbs, salt and pepper, Lea & Perrins and a free range egg

Using your hands mix everything well, and form into balls. Ive made them as large as a 1/2 pound each, but golf ball sized is one of my favourites. 

Monday, December 13, 2010

Garlic Potato Latkes, my 1st attempt

Ive got to say,  prior to last night  I had only ever tried Latkes once,several years ago, and those were grey and tasteless.. and not very inspiring.  So imagine my surprise when I find myself making, and liking, them on a whim.. well actually after a conversation on FB about them.   True  to form, I couldn't even stick the recipe I had found on a fellow foodies site even though I usually try really hard  to follow it the first time :) So here is my first take on Latkes. 

To make 2 large Latkes you will need:
  • 1 large russet potato
  • 1 large egg ( Free range if you can )
  • 1 Clove of Garlic, minced
  • Extra Virgin Olive Oil
  • 1/4 cup whole wheat flour
  • Sea Salt & Black Pepper  
  • Lea & Perrins 
  • Bourbon Street Bad Hot Sauce 
  • Oven Safe Frying Pan


First up grate your potato into a mixing bowl, I prefer the plastic grater for potato.  
Once grated add in the flour, garlic and salt and pepper. 


Saturday, December 11, 2010

Who needs words when you have food pics:) LWMF 1

Ive been thinking about , how to get an extra post in every week. I came up with this idea the other day ,  Once every week Ill post a week in review, kind of post.  With just captions, and maybe a short blurb. So here is my first try at this : Please let me know what you think ... all suggestions, and comments are appreciated. 

Marmite & Chili Roast Beef & Root Veggies.

Vegetarian Dinner, Jacket Potato with garlic/onion baked beans and cheese :)

Wednesday, December 8, 2010

Easy Hand Cut Chips

I just love potatoes...  mashed, baked, roasted, even boiled, pan fried to name a few .  Or as in this post , deep fried.   I call them chips, potato chips to me are crisps  :)   but to most they are fries or french fries.  Probably due to years of advertising on TV, whenever I hear the word fries, i think of red cardboard sleeves stuffed full of salty / greasy mass produced shoestrings.  

Growing up we had chips a fair bit , Almost every Monday night it was cold meat & chips night ( the cold meat being the leftover Sunday roast )    always hand cut and deep fried in vegetable oil on a big pot on the stove.  I used that method until I nearly caught the stove on fire , and severely burned my hand avoiding just such a disaster.  After that I bought a little hot pot deep fryer, not the automatic ones but a nice simple bucket with no exposed elements , and a quick release power cord.  Ive also switched the oil over to sunflower or canola oil , currently its a blend of both I'm using. 

 This post was requested thru my FaceBook Food Page ( link at bottom of page ) on which I regularly post my dinners,  and keeping with tradition . I really enjoy my Monday night cold meat and chips dinner.  Its a nice simple, and fast way to get food on the table . Okay , on to the chip making. 

Start with a washed potato, I like russets, or Yukon golds, but any will do.  Simply cut it in half lengthwise, and then cut each half lengthwise again. ( Quartering it )  
Don't forget to get your oil warming up , I like 375F for mine.   

Normally cutting in half , and then slicing into quarters is good enough, but this year the spuds are HUGE , this one topped 1lb (450gm) .  So i cut a 1/2  inch (1 cm) slice from the cut side. 


Monday, December 6, 2010

Making Hamburger Frittatas - Creative Leftovers #3

I'll start by explaining Creative Leftovers, its a simple and easy way to use up all the extra food I always seem to cook. Sometimes even on purpose.  I know there are lots of people out there like me , that simply don't want to eat the exact same meal two days in a row. 
So today, I'm going to take two of my favourite meals , and combine them for an amazing leftovers creation.
Homemade hamburgers and Frittatas!!
I could not decide on which one to show you , so I choose three.  All using hamburgers from the night before, and all with different ingredients. 
You will need an oven safe pan for this recipe.  Cast iron,  or non stick works the best. 

Frittatas are really easy to make,   you don't need this many ingredients ... but it can't hurt either.

I like to have everything prepped and ready, bite sized pieces are best. Once you start the process going its all over in ten minutes. 

2 eggs per person is plenty, I also like to add about a 1/4lb of meat each.  Its all flexible and you can get away with almost anything. 

Don't forget to whisk your eggs.  Room temperature produces the best result.  At this moment you can add some great flavour to the dish.  I like to take a small hand full of the grated cheese, whatever herbs I'm using ( Usually Basil ) and a few cracks of black pepper.
My favourite ingredients are : Mushrooms, Onions , Red Peppers, Broccoli and Tomatoes.
Start sauteing, your veggies, I always seem to slip a minced clove of garlic or two in there as well.  About 5 minutes or half to two thirds cooked. At this point you will want to preheat your oven. 


Next up is the egg mixture, I like to shake the pan around until it looks even before adding the egg.  Be ready , and do this fairly quickly.  Pour in a clockwise motion around the pan.  Once it is starting to look like an omelet,  the edges are starting to cook, but still running on top.  Its time for the final toppings.  Depending how well done you like you broccoli , you can add it in here or ,save it for the next step.

Tomatoes, Cheese, Prosciutto salami , green onions and broccoli  are all  good for toppings. Of course we cant forget the cheese. This was freshly grated mozzarella and 6 year old cheddar. 

Into a 350F oven for around 12 - 20 minutes , depending on how many eggs you have used and the amount of cheese and toppings involved.  Just take a look at it ever couple of minutes.  You may need break the seal around the edge of the pan it get it out.  My method for telling when its done properly is, when the frittata can slide around in the pan without sticking, means the middle is done.  This also makes it a lot easier to slide it off the pan.   Otherwise you may have to cut it like pie. I simply slide it onto my butchers block and slice like a pizza.   A couple of minutes rest time before cutting will give you a nicer presentation. 
Tomato, Broccoli, Prosciutto salami, green onions, red peppers , hamburger, mushrooms and cheese make for an amazing lunch. 

Some have a little more cheese thank others. :)  Those crispy edges , to me, are the best part. 

They don't have to be all neat and tidy looking. 

They look just like an egg pizza to me :) So good, healthy, and tasty!!

Simply slice and serve, and enjoy.  They do reheat really well,  if need be.  300F oven for 10 or 15 minutes and they are as good as new. 

I'm going to try something new , and end with a photo for this post.   A couple of  important tips to remember are needed first.
Stove Top/Oven safe pan is a must.  Cast Iron is great.
Pan Size Guideline: 2 to 3 eggs - 6" -8" , 3 to 4 eggs - 8" -10" , 5 to 6 eggs - 12" pan.   
Room temperature eggs, I take them out at least an hour before.
Add broccoli, tomatoes, and deli meats just before the oven for best results.

Experiment and Enjoy, the possibilities are almost endless. 
Rich :)


Thursday, December 2, 2010

Who Doesn't Love Gravy !

Who doesn't love a good gravy?  Growing up in an English household, we tended to enjoy it quite often. Maybe a little more often than we should have , but hey I was a growing boy and needed all the calories i could get .  For years , I had just assumed Bisto was how everyone made gravy . Hahaha boy was I wrong.  Now I still have some on hand , its a great way to make a quick stew , or bulk up some leftover gravy.  What got me to thinking  was just how much I had started adding to it ,  in the beginning it was just the granules ( or the powder ) and some flour,  maybe a dash of L&P for fun .  Then I started adding the pan drippings, onions , garlic and a variety of other ingredients.  So I decided to break the mould and give scratch made gravy a try.  The first couple were a little rough , but now its almost as easy as grabbing the old familiar container. 
There  are so many options when it comes to gravy , i could spend a month making different ones , and still have barely scratched the surface of options available.  I like them thick, thin, clear, basic, and complex..   I rarely strain mine as i don't mind little bits of roast ,  onion,  or whatever else was stuck to the pan, in my gravies. This one is my average gravy, fairly thick , with a good amount of flavour. So lets get started :)
I like to start my gravy, in the pan I just cooked my roast in . Not required, buy highly recommended.

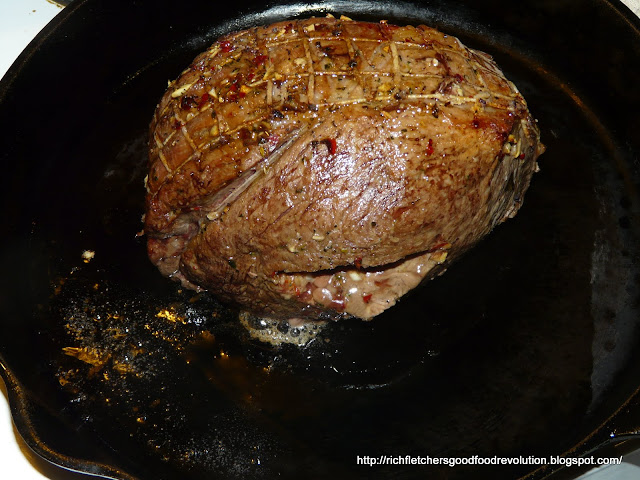
See all the goodness, on the pan.  That's what you want.  Normally there would be a lot more, but I had roasted this with veggies in a different pan  until half way, then transferred it to my cast iron pan when I realized i wouldnt be able to use the other one for gravy.
Remove the roast to rest , deglaze the pan with a  few splashes of red wine , and reserve the liquid for a couple of minutes.

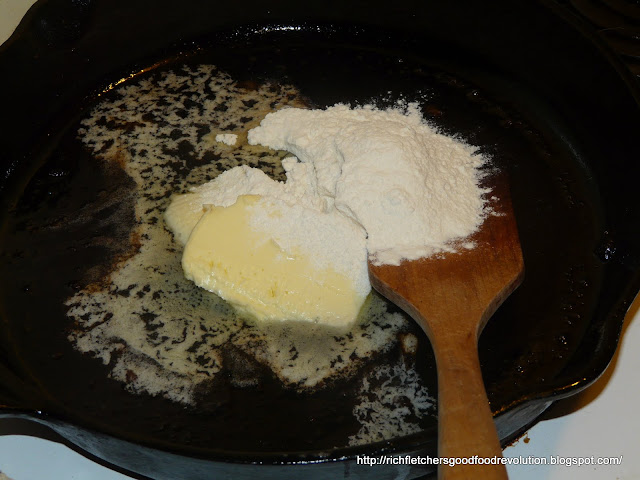
Start by making a roux, equal parts butter to flour. 

Once you have some melted butter to work with, start mixing.

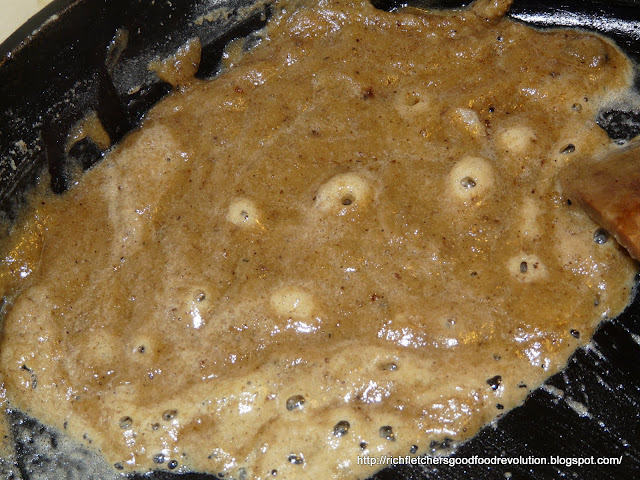
Mix until it has a nice consistency and colour  ( 5 minutes or so on medium heat ) less time for light gravies , more for darker.  You should not have any raw flour left at this point.

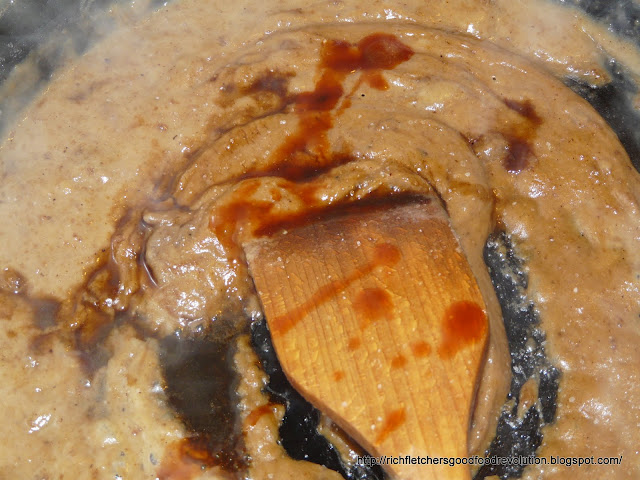
Time to add back in the deglazed red wine,  some water ( or stock, which I normally have on hand but didn't today )  and start building your flavours.  I just added some Lea & Perrins, and Bourbon Street Bad hot sauce, for now.

Keep adding liquids until you like the consistency , This was almost perfect  for me.  I added a splash of 10% cream... mostly just because it was there and only had a drop left anyways :)

Once you've got the colour, and thickness to your liking, it time to season to taste with sea salt and freshly cracked black pepper.  I added a few pinches of basil to it as well.  Remove from the heat, and get ready to plate your meal.
 I made a small error here , and left the gravy in my cast iron  pan while i plated and took all my photos... it didn't ruin the gravy at all , but just be warned cast iron continues to cook its contents even when off the heat .  It tasted great , but thickened up a but more than i would have liked.  However it did let me take great photos of the gravy . Which is sometimes hard to do.

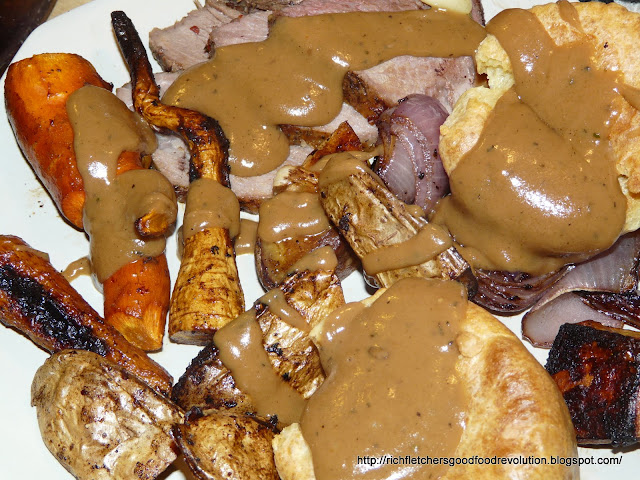
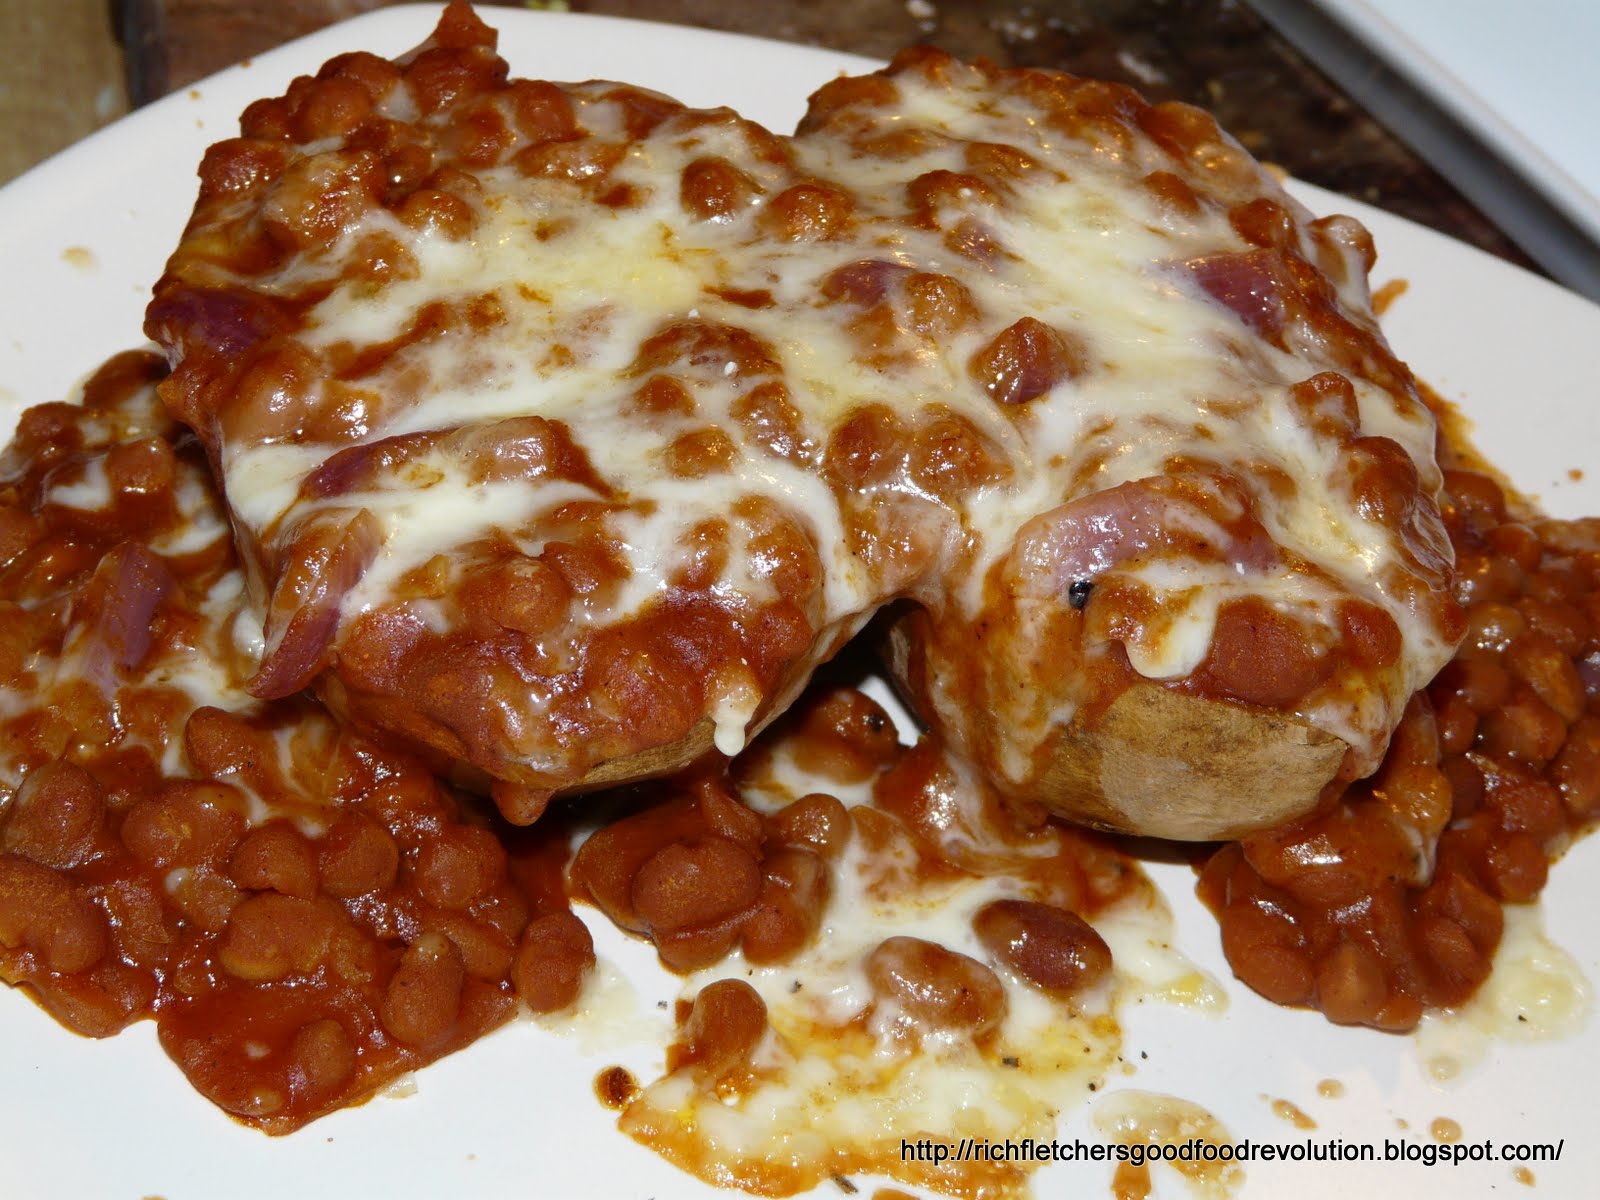
That's it , just add your homemade from scratch gravy to anything you like.  Personally ,  I like it on everything on my plate.
I have heard some horror stories about gravy , too lumpy , too runny , no taste etc..  this can all be fixed with just a little work .
Too thin, add a pinch or two of corn starch
Too thick, add boiling water ( if you boil your veggies, that water is the best! adds flavour ) or hot stock slowly , while stirring until you like it.
Too Lumpy,  either break up all the lumps with the back of a spoon, or simpley strain the gravy thru a fine sieve.. blender sticks can save the day too, if you don't want to lose the food bits in your gravy. 
No taste...  Check the S&P levels , add your favourite herbs, garlic, onions , mushrooms , red wine, ale ..  the options are endless. 

Enjoy & Happy Cooking !
Rich Fletcher

Sunday, November 28, 2010

Eggs don't come from a grocery store ;)

Just one short year ago , I thought all eggs were created equal.  I bought whichever one was on sale,  without a thought.  Besides there really wasnt much of an option to choose from ,  brown or white , large or extra large, and the most recent addition Eggs with omega 3s...  Of which I'd heard some very interesting stories about... ranging from genetically modifying the chick with fish genes.. to the more realistic story of adding omega 3's to the feed , thru fish oils and possible modified grains.  I must admit , I did try a couple packages of these, then went back to the standard issue eggs deciding it was not worth paying twice as mich..  Then about nine months ago, we started seeing Free Run eggs in the markets ...  not free range, but atleast the little chickens would have some access to outside.  I immediately switched over to these, the were a little more money, but I thought it was worth it as the egg did taste a little better , and had a nicer yolk.  
Then I met my new friends the Svetecs, at the farmers market , and for the first time ever .. I had access to free range eggs, real local farm fresh ones!!  Not mass marketed , only sold at the the farmers market and their farm.   Once again they were more than the standard issue eggs,  but surprisingly cheaper than the omega 3 ones though.   I grabbed a carton , and left thinking of bacon and eggs, and fritattas. That was about five months ago now,  and Ive never looked back.   Free Range only in my household now!  
So here I am five months later, working on the farm!! Mostly helping with building a huge greenhouse, but Ive also helped with garlic planting. Last week, I asked if I could help with the daily chores :  feeding and watering the chickens, turkeys and animals in the little petting zoo area.  Also of course the egg collection duty :)  I had so much fun,  I thought Id share my experience with everyone :)  Enough words!! Enjoy the pictures.
Its so neat how they all come to greet me :)


Interesting fact I learned, chickens love warm water when it cold out, and it helps with egg production .


I'm guessing I should come back in a few minutes :) lol

For some reason I assumed they would try and protect the eggs...  I was wrong. 

Little  kids hide your eyes!!  Caught in the act

I was amazed that so many eggs would be in one nesting box.  Washing is required.   

Eggs everywhere !!  :)

After the collection, I opened the door and let them have free range. 

Happy Chickens makes for great tasting eggs. 

and these birds sure are happy! 

Just cruising around pecking at anything in sight!

Free Range Goodness! 

So there you have a quick snap shot of my first day collecting eggs, I hope you have enjoyed it.  I urge you to find some free range eggs and give them a try, I'm positive you will be extremely pleased.  The colour, texture and taste is vastly superior to standard issue eggs! 

Happy Cooking ! :)
Enjoy those eggs
Rich

Friday, November 26, 2010

Meat Lovers Sirloin & Sausage Pizza - Pizza from scratch 3 of 3

Pizza!!  Such a wonderful, versatile food!!
If you have been following along , you can skip the next two pictures.   If your just finding this link or page,  this is part 3 of 3 , this is a quick photo recipe of how to make pizza from scratch. 


Red Pepper and Garlic Pizza Sauce

Click here for a photo how to : http://richfletchersgoodfoodrevolution.blogspot.com/2010/11/my-favourite-sauce-making-pizza-from.html

12 Grain Whole Wheat Pizza Crust ( Rolling pin optional :)
Click here for a photo how to : http://richfletchersgoodfoodrevolution.blogspot.com/2010/11/crisp-12-grain-pizza-crust-making-pizza.html

Assemble your ingredients.
 For the pizza toppings I used , this made enough meat for two pizzas, so if you only making one , or don't want extra .. divide the meat quantity by two. 
  • 1 pound ground sirloin
  • 1 Mexican sausage ( approx 1/4 lb )
  • 1 red bell pepper
  • 1 red chili pepper
  • 5 or 6 mushrooms ( Use your favourite, white ones were on sale :)
  • 1/2 Anaheim pepper
  • 1/2 poblano pepper
  • 1 medium red onion
  • 2 cloves of garlic
  • 3 roasted red peppers
  • 1 cup of your favourite cheese - I used Mozzarella and 6 yr old cheddar

Slice everything, except the red chili and garlic, these should be minced. 

I start the pan with a  a small hand full of onion, and a pinch of the garlic,  then add the meat.  Breaking it up with a spatula.  Cook on medium heat until lightly browned.

Save a small portion of the roasted red peppers and red onion for later.


Add all your veggies to the pan, I like to add a little S&P , and L&P at this point. Maybe a sprinkle of chili powder if your in the mood for it.
 Now is a good time to get the oven warming.  I cook slow and low, so 360F it is,  don't forget to preheat your pizza stone if using one.  Your pizza will cook more evenly. 

I like to sizzle this until the peppers are half way cooked, 5 minutes maybe . 

While the pan is on , you can grate your cheese.  I made the mistake of letting the Mozzarella  come to room temperature... made for difficult grating. 


Spread the pizza sauce over the crust, add a sprinkle of cheese , and move to the pizza stone.

Next  It's time for the good stuff,  Today I choose to pile it high!!  Try to spread it out evenly/

Once your happy with the meat and veggies, sprinkle the remaining cheese,  red onion and the roasted peppers over the pizza.  This was a meat lovers, but if you wanted to add some more cheese, it could easily become a cheesy meat lovers:)
 And into the middle of  the hot oven , for about 15 minutes. 

I like to let my pizzas sit for a few minutes before slicing. Seems to help when cutting a stacked pizza.  Leaving it on the stone will ensure its still nice and hot.

Nothing left to do now but , grab a slice and enjoy!!
Well, I hope you've found my 3 parts series on making a pizza from scratch helpful.I'm sure Ive missed a few steps in there somewhere. I was having a hard time putting thoughts to keyboard this week. So please fire away if you have any questions or comments. 
My favourite thing about pizza , is you have SO many options and styles to choose from... and almost any combination of goodies will work.  Just remember to have fun with it !  Enjoy!

Happy Cooking
Rich


Baking