Showing posts with label hummus. Show all posts

Saturday, September 6, 2014

Love Hummus !


Love homemade hummus !!   I made two for a neighbor's pool party  .. on the left is a spicy chili, roasted garlic and basil .. on the right , a roasted red onion , thyme and fresh garlic :))  MmmmMmmm just add some 9 grain crackers and your set ! Total cost for both $5 ( 20 people snacks worth ) The garlic & herbs were from my own garden too , making it extra special :)

#Simplegoodfood #GoodfoodCheap #RichsgoodFood ..
Here is one of my original recipes for hummus    :

http://richfletchersgoodfoodrevolution.blogspot.ca/2010/11/roasted-red-pepper-garlic-hummus.html
     

Saturday, January 28, 2012

Eating Local,even in Winter

While working in the fields of a local organic farm last summer,  I had a lot of time to think ... One of the many bonuses to working outside with your hands :)  During harvest season life was great , fresh local veggies everyday , just picked 10 minutes before heading home :)   But what about winter ?  When I can't just simple pick something fresh, either from the field or from the grocery store.   I decided this year , I was going to challenge myself to continue to eat local thru the worst two months for fresh, local food here.  January and February ...   So i started stocking up ,  between a few farms and my own garden I managed to pack away a few hundred pounds of veggies...  lots to see me thru the two months I promised myself.    Quick numbers are 150 lbs of potatoes , 75lbs of acorn and butternut squash, 100lbs of tomatoes, jarred and frozen as a garden sauce,  50lbs of red peppers mostly all roasted and frozen , along with onion and garlic ( quick flavour adders ) ,100lbs of onions and 50 head of garlic .   I did have ambitions to put away more, but simply ran out of time and freezer space ...  It didnt help that the 20lbs of carrots went bad on me lol ..   Looks like I wont have a huge variety to choose from , but it should be fun , and best of all LOCAL :))  I'm already thinking ahead to next year ...   more frozen soups or puree's for sure , and more root vegetables carrots, parsnips, turnips etc...  More variety in canning , not just tomatoes :)

Four weeks in ,  Im really craving a nice big Caesar salad lol .... but its been fun,  Here are a few of my creations so far :)

Roasted Red Pepper n Garlic Hummus :) 

Roasted Red Pepper n Garlic Hummus, garden tomato sauce, red onions, garlic ,  ground beef , and roasted red peppers...  all local :)) Making  homemade hamburger helper :)   


Saturday, June 11, 2011

Less Words, More Food 14

Wow ,  Can't tell that I like this format of posting .. this is number 14 in this series ! LOL  It is a handy way to to catch up on LOADS of of food pix I have to share with you . Please if you see something you like, just ask , and Ill write it up as a recipe for you .  On the flip side if there is something you don't like , please let me know so I can fix it or avoid it in the future.  This shots go back to April... that's how far behind I am now ... lol , well after this post Ill be caught up to May .  Enjoy :))

My version of Bangers and Mash :))) Loaded of course !  

A great Meatball Pasta bake , and soon to be a blog post ( its next ! ) 

Mmmm just gotta love roasting Beef!!  

The roasted  goodies for a nice hummus!!

Roasted Red Pepper, Onion & Garlic Hummus :)) 

Put it together for cold roast beef , and chips :)) With hummus and a fresh tomato. A Simple and Easy way to get Creative with your leftovers!!  

My new favourite way to make eggs.,, with the onions and garlic in the same pan !  Mmmm gotta love Free range eggs ! 

Another favourite of mine, Bacon ,Egg and Chips!! Mmm
Yeah!! April is done!! Hahahahaha I hope you all have enjoyed this post . As always , all feedback is welcomed.  Have a great day  :))
Happy Eating
Rich

Monday, January 31, 2011

Less Words, More Food 5.0

The end of January already?? Where does the time go :)  Hopefully its toward eating , drinking and being merry! This month I had the privilege of taking care of a Farmers chickens, feeding and egg collecting duties everyday.  Was a lot of fun, Ive handled more eggs in the last month than my whole life combined I think ...  with approx 50 a day x 30 days = 1500 eggs !!  Wow, all from 65 birds... and in the middle of winter!!  So Ill start with the barn and move on to some food.   I'm almost caught up :) All of these are from 2011!! lol Enjoy


Love old barns

Almost all the chickens :) Its Feeding time!! 

Making a pot of beef stock, Roasted the bones for extra flavour, some onion and garlic thrown in for good measure. 


Sunday, January 16, 2011

Bacon & Mushroom Hummus - 10 with 5 , post #2

Okay , so this is probably the least healthy hummus I have ever made... lol I was trying to come up with something different , and unusual for the 10 recipes with 5 ingredients challenge. I knew I wanted to have a hummus in there somewhere.. and came up with the idea to skip the olive oil and use bacon :))  Everyone loves bacon right ??  I did include an apple in this snack , that makes it healthy again right ??

Ingredients required for a large cup full:

1 cup of cooked chick peas ( reserve a half cup of cooking water ) 
3 or 4 mushrooms - Your choice, I had white ones that needed to be used up 
3 or 4 pieces of bacon
2 cloves of garlic 
1 Granny Smith Apple

A note about chick peas, if your using dried ones, you will want to have them soaked overnight, before boiling them for about a hour.  If using canned ones ,  triple rinse , and then bring them to a boil for 15 minutes. For this one I used previously boiled , then frozen ones...  10 minutes in boiling water was all they needed.  

This is not my usual butcher's bacon , but the price was right :) and it tasted good.
When the bacon is almost finished ,  strain off the bacon grease , and reserve. 

I prefer my bacon crispy :) and give it a couple of minutes more in the dry pan. 

Thursday, December 16, 2010

MMmmm Meatballs!!

Who doesn't love meatballs ??  You can make them out of almost anything .. Beef , Pork, Turkey , chicken or just about anything that can be ground up :)  They can be baked, pan fried, added to a stew or casserole...  the options are almost endless once you start thinking about what you can put in the meatball itself .  Today I'm going to show you one of my favourites,  simply, easy and loads of flavour.  For this meatball adventure, I'm going to start them in the pan , and finish them in the oven.  So if you are following along , you will need an oven safe pan.  

The minimum required is just a pound of meat , and egg and bread crumbs... but don't be afraid to have a look around in your fridge for some extra flavours.

Here I have diced Red Onion, Red Pepper, Mushrooms, some garlic/mushroom hummus, a couple loves of garlic,  a pound of free range ground beef, a dried chili pepper,  bread crumbs, salt and pepper, Lea & Perrins and a free range egg

Using your hands mix everything well, and form into balls. Ive made them as large as a 1/2 pound each, but golf ball sized is one of my favourites. 

Saturday, December 11, 2010

Who needs words when you have food pics:) LWMF 1

Ive been thinking about , how to get an extra post in every week. I came up with this idea the other day ,  Once every week Ill post a week in review, kind of post.  With just captions, and maybe a short blurb. So here is my first try at this : Please let me know what you think ... all suggestions, and comments are appreciated. 

Marmite & Chili Roast Beef & Root Veggies.

Vegetarian Dinner, Jacket Potato with garlic/onion baked beans and cheese :)

Monday, December 6, 2010

Making Hamburger Frittatas - Creative Leftovers #3

I'll start by explaining Creative Leftovers, its a simple and easy way to use up all the extra food I always seem to cook. Sometimes even on purpose.  I know there are lots of people out there like me , that simply don't want to eat the exact same meal two days in a row. 
So today, I'm going to take two of my favourite meals , and combine them for an amazing leftovers creation.
Homemade hamburgers and Frittatas!!
I could not decide on which one to show you , so I choose three.  All using hamburgers from the night before, and all with different ingredients. 
You will need an oven safe pan for this recipe.  Cast iron,  or non stick works the best. 

Frittatas are really easy to make,   you don't need this many ingredients ... but it can't hurt either.

I like to have everything prepped and ready, bite sized pieces are best. Once you start the process going its all over in ten minutes. 

2 eggs per person is plenty, I also like to add about a 1/4lb of meat each.  Its all flexible and you can get away with almost anything. 

Don't forget to whisk your eggs.  Room temperature produces the best result.  At this moment you can add some great flavour to the dish.  I like to take a small hand full of the grated cheese, whatever herbs I'm using ( Usually Basil ) and a few cracks of black pepper.
My favourite ingredients are : Mushrooms, Onions , Red Peppers, Broccoli and Tomatoes.
Start sauteing, your veggies, I always seem to slip a minced clove of garlic or two in there as well.  About 5 minutes or half to two thirds cooked. At this point you will want to preheat your oven. 


Next up is the egg mixture, I like to shake the pan around until it looks even before adding the egg.  Be ready , and do this fairly quickly.  Pour in a clockwise motion around the pan.  Once it is starting to look like an omelet,  the edges are starting to cook, but still running on top.  Its time for the final toppings.  Depending how well done you like you broccoli , you can add it in here or ,save it for the next step.

Tomatoes, Cheese, Prosciutto salami , green onions and broccoli  are all  good for toppings. Of course we cant forget the cheese. This was freshly grated mozzarella and 6 year old cheddar. 

Into a 350F oven for around 12 - 20 minutes , depending on how many eggs you have used and the amount of cheese and toppings involved.  Just take a look at it ever couple of minutes.  You may need break the seal around the edge of the pan it get it out.  My method for telling when its done properly is, when the frittata can slide around in the pan without sticking, means the middle is done.  This also makes it a lot easier to slide it off the pan.   Otherwise you may have to cut it like pie. I simply slide it onto my butchers block and slice like a pizza.   A couple of minutes rest time before cutting will give you a nicer presentation. 
Tomato, Broccoli, Prosciutto salami, green onions, red peppers , hamburger, mushrooms and cheese make for an amazing lunch. 

Some have a little more cheese thank others. :)  Those crispy edges , to me, are the best part. 

They don't have to be all neat and tidy looking. 

They look just like an egg pizza to me :) So good, healthy, and tasty!!

Simply slice and serve, and enjoy.  They do reheat really well,  if need be.  300F oven for 10 or 15 minutes and they are as good as new. 

I'm going to try something new , and end with a photo for this post.   A couple of  important tips to remember are needed first.
Stove Top/Oven safe pan is a must.  Cast Iron is great.
Pan Size Guideline: 2 to 3 eggs - 6" -8" , 3 to 4 eggs - 8" -10" , 5 to 6 eggs - 12" pan.   
Room temperature eggs, I take them out at least an hour before.
Add broccoli, tomatoes, and deli meats just before the oven for best results.

Experiment and Enjoy, the possibilities are almost endless. 
Rich :)


Sunday, November 21, 2010

Rich's Wild Hummus Pizza Sauce! - Pizza from scratch 1 of 3

The hardest thing about making this pizza sauce was coming up with a title for it! :) I think I spent more time staring at the screen trying to come up with something that will do it justice, than I did prepping the sauce. So I decided to keep it simple.  As it is my favourite , so far anyway ;)
Ive been making Pizza at home for a long time,  just not completely from scratch. I used to buy all these fresh, healthy and wonderful toppings and then pile them on top of a pre-made crust and use store bought sauce ... which between the two usually cost as much as the toppings ??  Tasted pretty good. Certainly better than frozen , or most take outs.  Still, it just never made sense to me to spend that much for sauce and bread?? So a couple of years ago I started making my own sauces, at first using canned tomatoes and paste as a base...  and finally this year with fresh tomatoes from my garden. Now that it is November here in Canada , local hot house ones will have to do :) 

This should make enough for three 12" pizza crusts, You will need:
  • 3 of your favourite tomatoes, I used Ontario hot house ones for this one.
  • 3 tablespoons secret ingredient ( revealed below :)
  • 3 Mushrooms, usually I would use cremini mushrooms, but had white ones on hand.   
  • 1/2 of a medium red onion
  • 1 clove of garlic
  • A few shakes of Italian Herb ( or basil, oregano, rosemary )
  • 2 Roasted Red Peppers ( leftover from making hummus :) 


Roughly chop the tomatoes, mushrooms, and onion .  Mince the garlic. 

Warm a small saucepan with some splash of sunflower oil, add most of the garlic and onion , saving a pinch of each..  sizzle for a couple of minutes.

Add the chopped mushrooms , and continue for a couple more minutes. 

Remove from the pan, reserve this for a little later. 

In the same saucepan,  drop in the tomatoes, red pepper, and the raw garlic & onion saved from above.  A few cracks of fresh black pepper , a pinch or two of sea salt, Italian seasoning and a couple of glugs of olive oil. Simmer on a medium heat, stirring every ten minutes or so. Set a timer for 45 minutes, it should get you close. 


After about 45 minutes,  it should looks something like this..  not quite solid,  but getting a thicker.  If its too watery , you can turn up the heat , and reduce it alot quicker while stirring more frequently.  I'm usually prepping the rest of the pizza toppings , or baking the crust while this is simmering so I go for the low and slow method and will just leave it simmering for another 20 minutes if needed. 

Add in the special ingredient :) My Roasted Red Pepper & Garlic Hummus ( See link below for a how to ) the reserved onions and mushrooms.
 http://richfletchersgoodfoodrevolution.blogspot.com/2010/11/roasted-red-pepper-garlic-hummus.html

Just give it a quick stir and a few minutes simmering to help blend the flavours.

If you have one, use your stick blender.. or transfer to a food pro or blender. 
I MUST add at this point,  blending in a small saucepan does NOT work !! lol

I recommend transferring to a medium/large heat resistant measuring cup for the blending process :) 
   
And that is it , you have an amazing ,healthy and tasty pizza sauce .. all that is left is to spread it on your pizza crust or flat bread :) 
I hope you liked my new favourite pizza sauce. Please check back soon, or sign up for the email notifications, for part two .. how to make your own 12 grain pizza dough : ) I was hoping someone could help me out with a better title ? Any suggestions ??  

Happy Cooking!
Rich 
    

Pizza Sauce on FoodistaPizza Sauce

Wednesday, November 17, 2010

Roasted Red Pepper & Garlic Hummus

You've seen them. At the grocery store , all those stacks and stacks of plastic tubs with different colours , and flavours gleaming at you from near the deli isle :)  I used to stop there every week, and drop $5 on a small tub of Hummus... usually it was a roasted garlic , or red pepper.  That was before I started making my own. My first attempt was almost identical to this posts version, Which I must say I enjoyed immensely. So  I thought Id try to recreate how it all happened for me and share.The best part is that after my second batch turned out as well as the first I swore myself off the store bought, and now enjoy a healthier, tastier and cheaper hummus made by me, with my tastes in mind.  Plus I get to control all the ingredients, which can be as few as three. I do try not to add more than eight or ten , as you tend to start losing some flavours. 

Okay, enough babbling.  Time to show you how easy this is. 

The most cost effective way to make this is to buy a bag of dried chick peas ( also called garbonzo beans ) , If you can find organic ones, grab them. Besides the lack of chemicals, I find them to have a better texture. .   

  Pour them into a bowl, and pick out any green or black ones. They always mention to look for stones too, but I have yet to find one. 

The dried peas do require an overnight soak.  If you don't have the time or the patience for this step ,  buy some good quality canned ones and skip the next two steps :)  If your in Canada the PC Organic Chick Peas are really good for canned ones
Dried chick peas NEED to soak overnight . Make sure the are well covered in water and simply soak for 24 hours.  I think the alternative is to boil them for 4 hours, but I have not tried this. 


Once they have soaked, or if you are using canned ones instead. You will need to give them a good rinse, and have a double check for any funny coloured ones.  Notice one on the right that slipped thru the initial inspection. 
Next up, add them to a large pot of boiling lightly salted water. You will want lots of water, about 4 cups for every cup of peas.  The packages always say to boil for 45 minutes, which is fine for using the  chick peas in dishes, for hummus I like to add more water at the 45 minute mark and boil for a further 30 minutes.
If, like me and using the whole bag. You will have way more garbonzos than you know what to do with. Give them all one more good rinse. Then I like to freeze the extra  in 3 cup portions.  That way the next hummus you make will eliminate all the above steps.

Now the fun begins, assemble all your flavours.  I'm using organic garlic, black sesame seeds ( for garnish ), Tahini Paste, L&P, Sea Salt, Black Pepper , Olive Oil, Of course chick peas ( I used 3 1/2 cups of boiled ones. ) and as in my first attempt a jar of fire roasted peppers these were water packed ones.   

Chuck everything into a food pro.  I only chop the garlic, the rest is whole.  I used 2/3rds of the jar of peppers,  you can use more or less. But I have a plan for the remaining 1/3.  (Future Post Hopefully)  plus I added a shake of my chili powder and a few pinches of basil at the last moment. 

I usually start it up on slow speed with a few good glugs of olive oil.. once it gets going I increase the speed and add oil until you like the consistency.

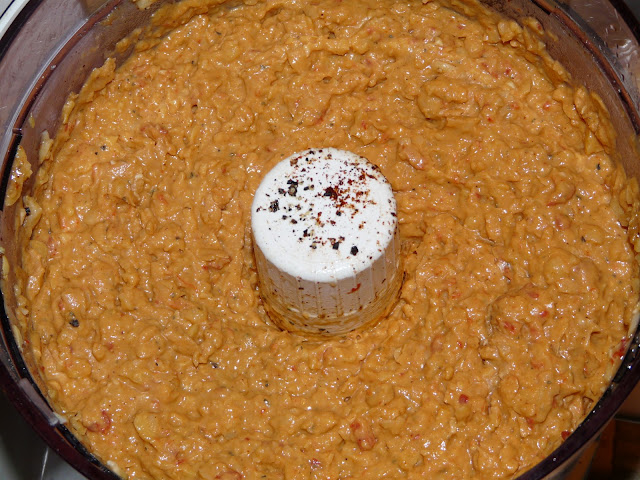
Don't forget to stop and have a good look and taste, It may seem like your adding a lot of salt,  but your making 4 cups of hummus .. that is quite a lot.  ( 4 grocery store tubs worth! )

Once you've reached the consistency you're looking for. ( I don't like it lumpy ,  but do stop before it gets creamy ) Pour it, with the help of a spatula into a resealable container.  I also like to sprinkle something on top.  This time its black sesame seeds and coarse sea salt.
That's it, you now have 4 cups of an amazing roasted red pepper and garlic hummus :) About 4 times what you'd get in a prepackaged one at the store , all for about the same price as one 1 tub.   PLUS you should have at least a few packages in the freezer.  Now all that's left to do is grab yourself some homemade bread and veggie sticks and you've got a great lunch , or even a light dinner.  Or like tonight, a great late night snack. 
Happy Cooking!
Enjoy :)
Rich